Getting Started: The Cofactr Workflow (BOM to Kit)
Last updated: November 13, 2026
New to Cofactr and not sure where to start? This is the simplest top-to-bottom path through the platform, from uploading a BOM all the way to shipping a finished kit. There are six main steps, and a couple of them have smaller sub-processes tucked underneath. Skim the diagram first, then follow the steps in order, since each one builds on the last.
Note: This guide walks through the full workflow, start to finish. You don't have to use all of it. You can also purchase and kit individual parts on their own without running the whole BOM-to-kit flow, so use whichever pieces fit what you're doing.
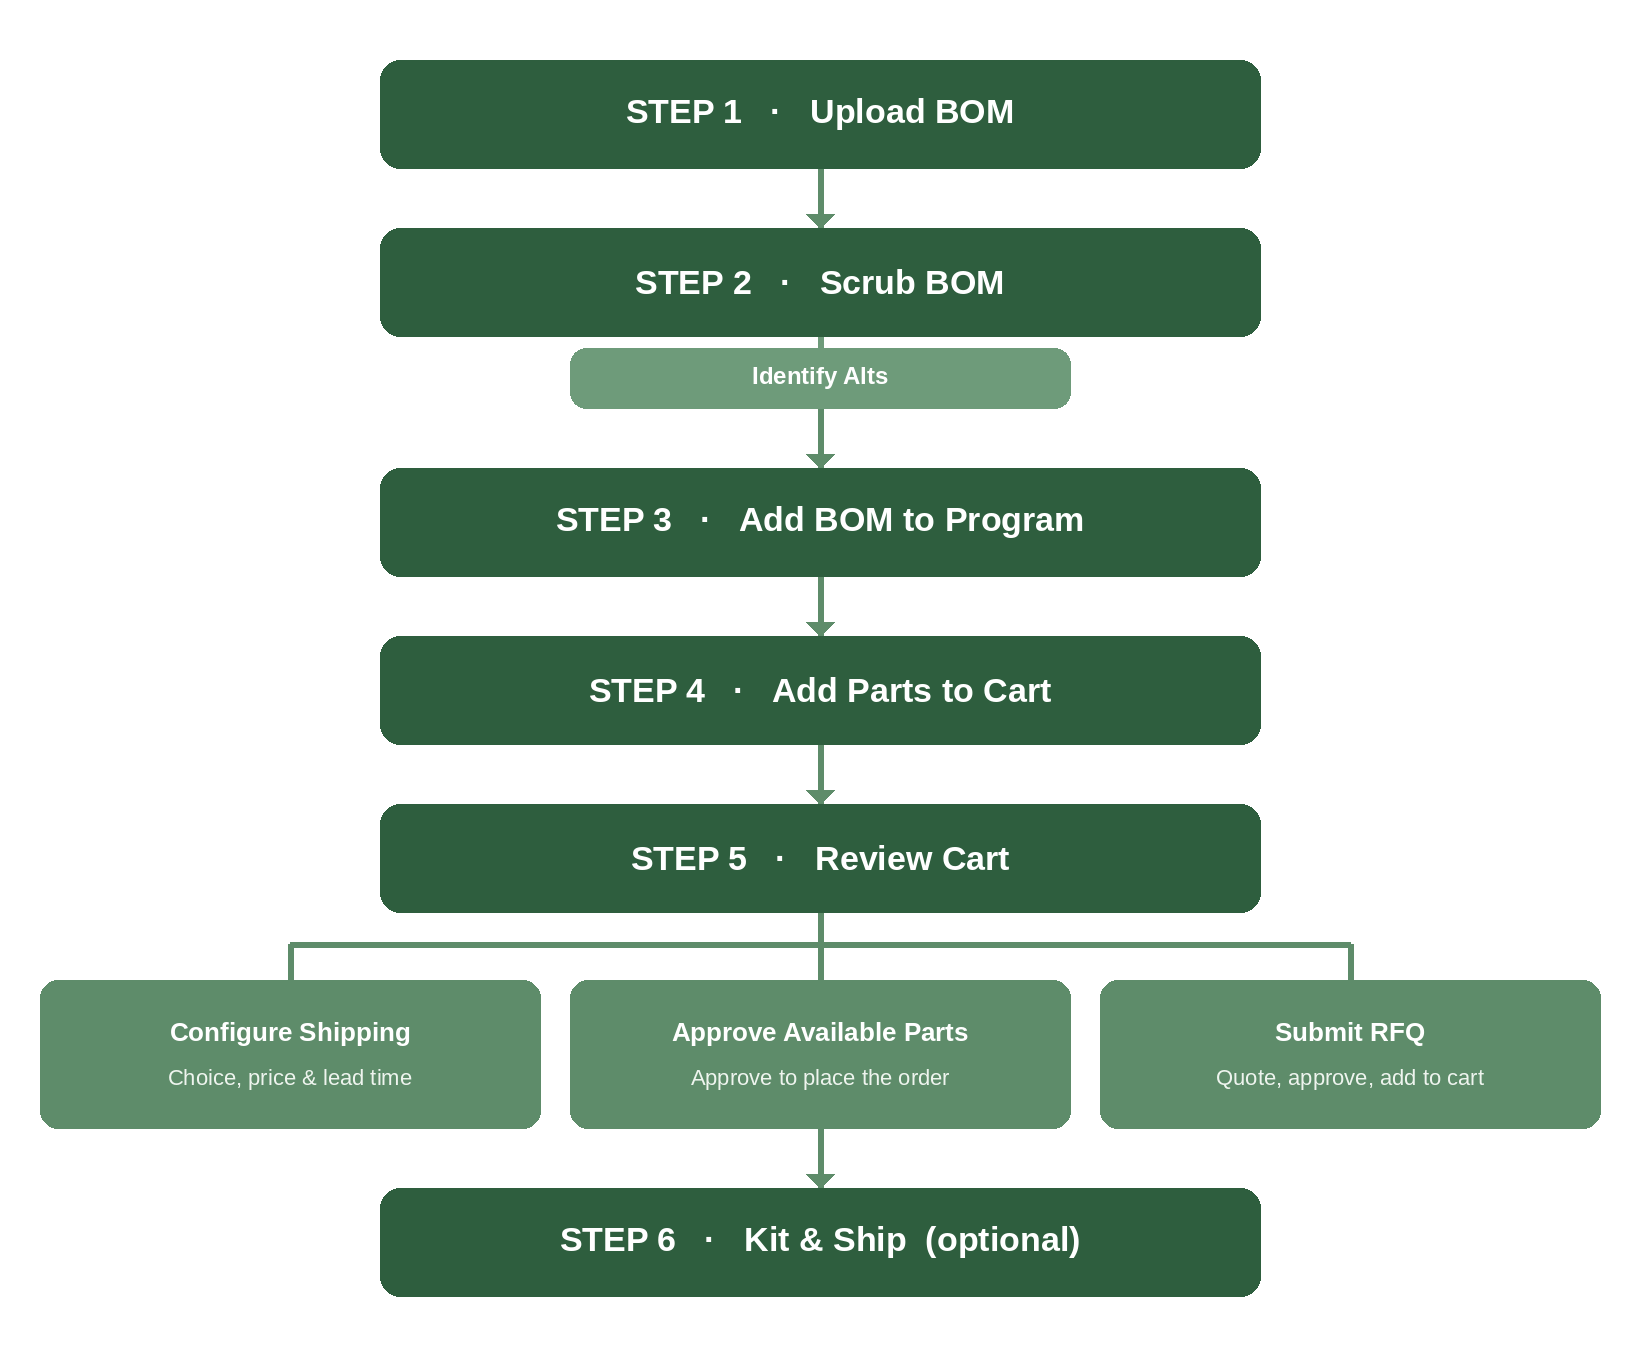
The six steps run top to bottom: Upload BOM, Scrub BOM, Add BOM to Program, Add Parts to Cart, Review Cart, and Kit & Ship. Two of them carry sub-processes. Scrubbing includes identifying alternates, and reviewing your cart includes configuring shipping, approving available parts, and submitting RFQs. One thing worth knowing up front: your cart holds both readily available parts and parts that still need quotes, so you never have to juggle separate carts.
Step 1: Upload Your BOM
You get your parts list into Cofactr by uploading a spreadsheet, or by creating an empty BOM and adding parts by hand. To upload, click "BOMs" in the left navigation, then "Upload BOM" in the upper right corner. If this is your first one, the list will be empty, which is expected.
Drag your file into the dashed frame or click "Select File" to browse for it. Cofactr accepts .xlsx, .xls, and .csv. Give the BOM a name and version. You can optionally add a Part Number and Team.
Note: Name and Version are the only required fields.
If your file has more than one tab, pick the sheet that holds your parts, then select the row that contains your column names. Cofactr will try to match your columns to its own fields automatically. Make sure you have mapped an MPN column, the manufacturer column, and either a Quantity or Reference Designator column, since those are what Cofactr needs to work (required fields). For the full list of column names Cofactr recognizes, see BOM Upload Requirements.
On the next screen you can exclude any rows you don't want by checking "Delete Row", and flag custom parts by toggling "Custom Part" to save yourself errors later. If you flagged rows to delete, click the red "Delete Selected Rows" button. Otherwise, click "Upload" and you'll land back on your populated BOM.
Tip: Save a clean BOM template once and reuse it for every upload. Consistent column names mean Cofactr's auto-mapping gets it right every time.
Step 2: Scrub Your BOM
As soon as your BOM is in, the Ailana AI scrub popup appears on its own to help you clean things up before the parts reach a program. This is also where you review alternates, so don't click past it. Scrubbing your BOM is the most important step of the process!
Work through the scrub to sort out unknown parts, review suggested alternates, merge duplicates, remove lines you don't need, mark parts Do-Not-Place, and confirm package types. For anything that comes up as "No Match", correct the MPN, or click "Create New Part" if it's a custom component so Cofactr remembers it next time. For the full walkthrough on that, see Creating Custom Parts.
When Cofactr suggests alternates, review each one before accepting, comparing price, lead time, lifecycle status, and compliance. During the scrub, Cofactr flags parts that need your attention: "No Match" parts won't flow into your program until you resolve them, and parts marked "Needs RFQ" will need a quote later, in Step 5.
Warning: Do not skip the scrub. Leaving "No Match" flags unresolved will drop those parts from your cart's PO, and unconfirmed packaging types throw off attrition calculations down the line. Approving every flag without reading it is the most common cause of cart errors, so take the extra minute here.
Step 3: Add Your BOM to a Program
A Program is your build workspace. It ties one or more BOMs to a build quantity, a production date, and a facility, and once a BOM is attached, all your purchasing flows through the program. There are two ways to set this up.
From the BOM panel, click "Add to Program" to attach it to an existing program, pick the program, enter your build quantity in the "Multiple" field, and click "Add To Program". To spin up a new one instead, click "Create Program", enter the build quantity, review the name, optionally set a Production Location and Business Line, and click "Submit".
You can also start from the Program module. Click "Programs" in the left nav, then "New Program", fill in the name (something like "Prototype Board v2, 10 Units"), Production Location, and an optional production date and business line, then click "Submit". Open the new program and, in the "This Program" section, click the circle icon with a "+" to add your BOM, set the "Multiple", and click "Add BOM".
Note: Purchase through a Program whenever you can. Parts bought through a program automatically reserve to that program when they arrive. Parts bought straight from a BOM do not, which means other people in your org can consume them before you do. For more on how reserving works, see Allocating Inventory.
Step 4: Add Parts to a Cart
Now you pick what to buy. Open your Program and select the parts you want, or select every line to buy the whole BOM, then click "Add to Cart". In the panel, you can adjust quantities and toggle label options like "Print RefDes" or "BOM Line Numbers".
Add the parts to an existing cart or create a new one with a clear name and any optional details, such as a target delivery date, notes, team, tags, or suppliers. Your cart then shows up in the upper left corner of the platform and in the "Open Cart" section of your program lifecycle diagram.
Note: Available and RFQ parts land in the same cart. Cofactr sorts them for you: readily available parts based on your selected LT go in the bottom, purchasable section, and parts marked "Needs RFQ" go into a yellow section at the top. You handle both in the next step.
Step 5: Review Your Cart
This is where a cart becomes an order. Three sub-processes run side by side inside the same cart: configuring shipping, approving the parts that are ready to buy, and sending the rest out for quotes.
Submit RFQs for Unavailable Parts
The yellow section at the top contains items that require supplier quotes. Submitting an RFQ kicks off a short loop that ends with those parts back in your cart, ready to order.
Select the parts in the yellow section and click "Add to RFQ", add any notes for procurement like a target price, acceptable alternates, or urgency, then click "Submit RFQ" to send it to Cofactr's procurement team. When the quotes come back, head to "Sourcing" and then "Supplier Quotes", open each one to review price, lead time, and supplier, and click "Approve" to accept it or "Reject" to pass. You can also review your whole RFQ holistically by going to "Sourcing" > "RFQs" and clicking into your unique RFQ code, or searching by that code.
If your parts are already in a cart from the previous steps, they will automatically update with the quotes you receive back. For example, if you received a quote back for qty 100 of a specific MPN with a 14 day LT, if you select the 14 day LT in your cart it will automatically apply that quote if its the cheapest price at that LT. If these parts are not in a cart yet, you can click the cart button to add them to a cart. From there, you configure and approve shipping for them just like any other available part. If you're ever unsure what a status means along the way, Understanding Statuses in Cofactr breaks them all down.
Tip: Compare total cost, not unit cost. When you approve quotes, look at total landed cost, meaning unit price times quantity plus freight and handling, not just the unit price. A cheaper quote with a much longer lead time isn't always the best choice.
Configure Shipping, Price, and Lead Time
Open the cart from the "Open Carts" section of your program lifecycle diagram, or hover over the cart icon in the upper left and click "Edit Cart" or "Checkout". Choose how the cart should ship, set your preferred lead time, and review the estimated unit prices and totals before you approve anything. You have three shipping options:
Shipping option | What it does |
|---|---|
Store at Cofactr | Parts are added to your inventory and stored at a Cofactr warehouse. |
Ship as Kit | Parts are checked, labeled, and kitted at a Cofactr warehouse, then shipped to the destination facility as one package. |
Drop Ship | Parts ship directly from suppliers to your destination, skipping the Cofactr warehouse. Please keep in mind not all suppliers support drop shipping in Cofactr. |
Approve Available Parts
The bottom section of the cart shows the parts you can buy right now from authorized suppliers. Confirm the quantity and unit price on each line, add a PO number if your finance team needs one, and double-check the shipping address. Click "Accept Terms and Conditions", then click "Approve" to place the order. Cofactr's procurement team takes it from there and places the PO with the supplier.
Warning: This is your last checkpoint before spend. Once you submit, changes require a supplier-side change request, which is slower and not always possible, so verify the shipping address, PO number, and total cost carefully before you click "Approve". For how and when you're actually invoiced, see Billing and Payments with Cofactr.
Step 6: Kit & Ship (Optional)
If You Chose “Ship as Kit”
Your order is already a kit and ship order, so the kitting is built into the purchase. As your parts arrive, the warehouse team checks them, labels them, kits them together, and ships the kit to the destination facility you set at checkout. [confirm: You don’t need to create a kit from your Program for these parts.]
If You Chose “Store at Cofactr”: Kit from Your Program
Parts stored at Cofactr stay in your inventory until you ask for them. When you’re ready to send them out, you create a kit from your Program. Open your Program, select the parts to include, and click “Add to Kit”. Add them to an existing kit or create a new one, adjusting quantities as needed.
If you’re adding to an existing kit, pick it from the drop-down, customize your labels with reference designators or BOM line numbers plus any prefix or suffix, and click “Confirm”. If you’re creating a new kit, set up the labels the same way, then either toggle “Approve after creation” to approve it on confirm, or leave it off to save a Draft. Click “Confirm” when you’re done. Once the kit is approved, the warehouse team picks the parts, kits them to your spec, labels them, and ships the kit out.
Warning: A kit in Draft won't ship. If you saved a Draft, open it in the "Kits" section of your program lifecycle diagram, open its right panel, and click "Approve" to send it to the warehouse. If you have unavailable lines, use "Recalculate Kit Line Allocations" to see why, or toggle on "Ship Partial" to ship what's on hand. A common reason a line shows unavailable is a non-PNP part, covered in PNP vs Non-PNP Parts.
Sending Your Own Inventory to Cofactr
Separate from the purchasing flow above, you can also ship parts you already own into a Cofactr warehouse to be stocked as consigned inventory. Create a shipment in the platform first so the warehouse team knows what's coming, then send the parts in. Once they arrive, the team ingests them and adds the stock lots to your inventory, where they can be allocated to a program or added to a kit like anything else. The full walkthrough lives in How to Create a Shipment (Ship to Warehouse).
Inside a Program, mark these parts as "I'll Ship this to Cofactr" under the "Include" column so they're treated as expected rather than purchased.
Note: Consigned stock isn't usable until it's ingested. A ship-to-warehouse shipment moves through Draft, Shipped, Received, Processing, and finally Ingested, and it only becomes usable inventory once it reaches Ingested.
That's the Full Workflow
That's the whole path, from a raw BOM to a kit on your dock. Once you've run through it a couple of times it moves quickly, and most of the guardrails above exist to save you a slower fix later. Need a hand? Use the in-platform chat or email success@cofactr.com.